Saturday, September 30, 2006

Simple MDB with Oracle Database JMS Provider

Continuing in my JMS explorations of late I was asked about clustering MDB on top of a simple topic backended by AQ. My first problem was I could not find a quick and dirty example of an MDB (EJB 3.0) using a JMS topic, the recommended JMS resource adapter approach of OracleAS 10.1.3 and on top of AQ. A simple hello world was all I was after.

Give me something very simple and I can go miles because the doc for JMS (http://download-west.oracle.com/docs/cd/B25221_04/web.1013/b14427/jms.htm#i1085966) and MDB (http://download-west.oracle.com/docs/cd/B25221_04/web.1013/b14428/mdb30cfg.htm#BCGFGDAI) explains all the advanced stuff and this OTN how-to (http://www.oracle.com/technology/tech/java/oc4j/1013/how_to/how-to-connect-to-oemsjmsd/doc/how-to-connect-to-oemsjmsd.html) gives a pretty rich example with a lot of detail on what the idiosyncracies are with setup.

However, despite this being easy, I also wanted quick set up using the tools provided by Oracle that combined setting up the resource adapter, configuring a topic and writing an MDB to process messages into one sequence of steps rather than 3 different tasks. This entry is devoted to getting going fast with such a sample - cobbled together from other similar examples, a bit of new stuff and a bit of begging and pleading from various people who built it all - thanks to Demed Lher (JMS PM), Debu Panda (EJB PM) and the ASControl 10.1.3 folks who made this possible.

Here goes:

1. Create a JMS user on your database and grant them AQ rights. I am using XE and you can tell I have a tough password policy:

sqlplus sys/welcome1@xe as sysdba

grant connect, resource, aq_administrator_role to jmsuser identified by jmsuser;
grant execute on sys.dbms_aqadm to jmsuser;
grant execute on sys.dbms_aq to jmsuser;
grant execute on sys.dbms_aqin to jmsuser;
grant execute on sys.dbms_aqjms to jmsuser;
exec dbms_aqadm.grant_system_privilege('ENQUEUE_ANY','jmsuser');
exec dbms_aqadm.grant_system_privilege('DEQUEUE_ANY','jmsuser');

2. Create a AQ topic - in this case JMSDEMO_TOPIC:

sqlplus jmsuser/jmsuser@xe
exec dbms_aqadm.create_queue_table(queue_table=>'JMSDEMO_QUEUE_TABLE', queue_payload_type=>'sys.aq$_jms_text_message',multiple_consumers=>true);
exec dbms_aqadm.create_queue(queue_name=>'JMSDEMO_TOPIC', queue_table=>'JMSDEMO_QUEUE_TABLE');
exec dbms_aqadm.start_queue(queue_name=>'JMSDEMO_TOPIC');
commit;

3. Create a data-source in OracleAS to point to the database user JMSUSER. I used Application Server Control to do this here by creating a connection pool called oemsdbPool and a data source called oemsdbDS:

Which could also be put directly into your data-sources.xml using this snippet:

<managed-data-source connection-pool-name="oemsdbPool" jndi-name="jndi/oemsdbDS" name="oemsdbDS"/>
<connection-pool name="oemsdbPool">
<connection-factory factory-class="oracle.jdbc.pool.OracleDataSource" user="jmsuser" password="jmsuser" url="jdbc:oracle:thin:@//127.0.0.1:1521/xe"/>
</connection-pool>

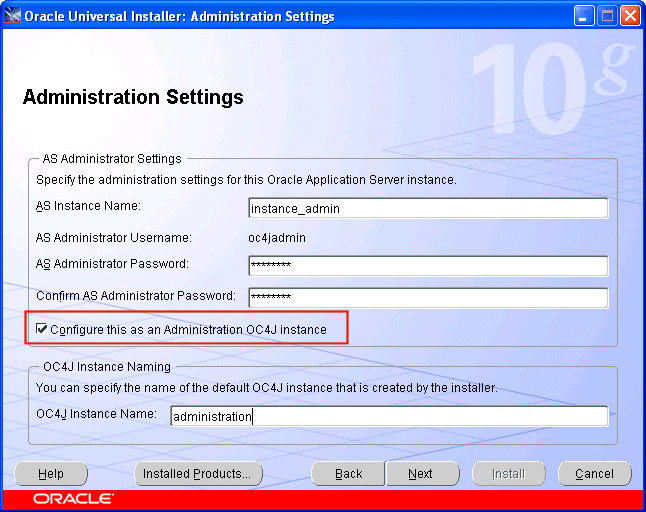
4. In order to use the resource provider approach for my MDB, I need to configure up the OEMS Database provider. Unlike 10.1.3.0 where this was a manual and configuration process, it is a nicely automated procedure in OracleAS 10.1.3.1 (I am using the Developer Preview).

The following 3 screen shots show how trivial the Application Server Control team have made this.

a. In the administration tab, click on the OEMS database persistence configuration

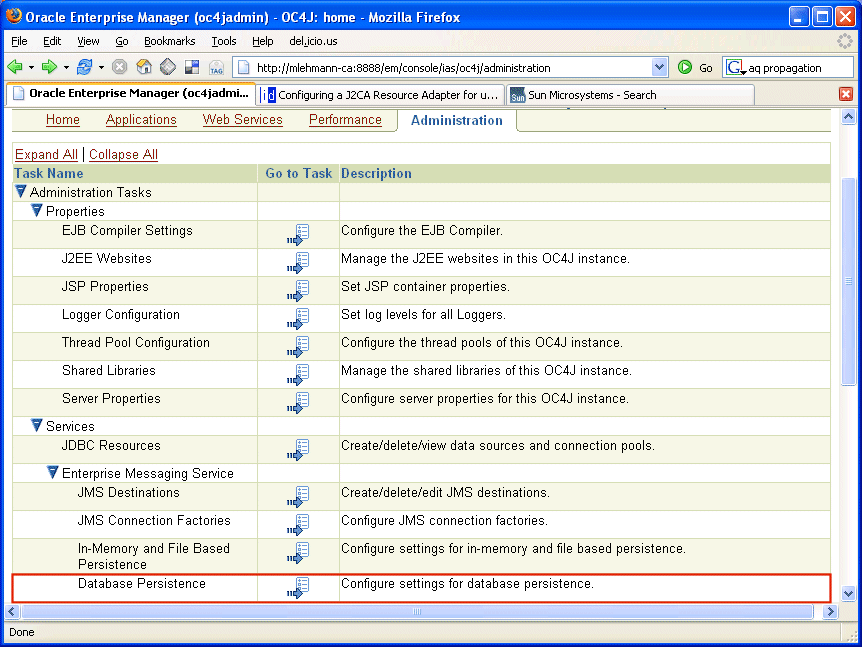
b. Click on the deploy button to deploy it

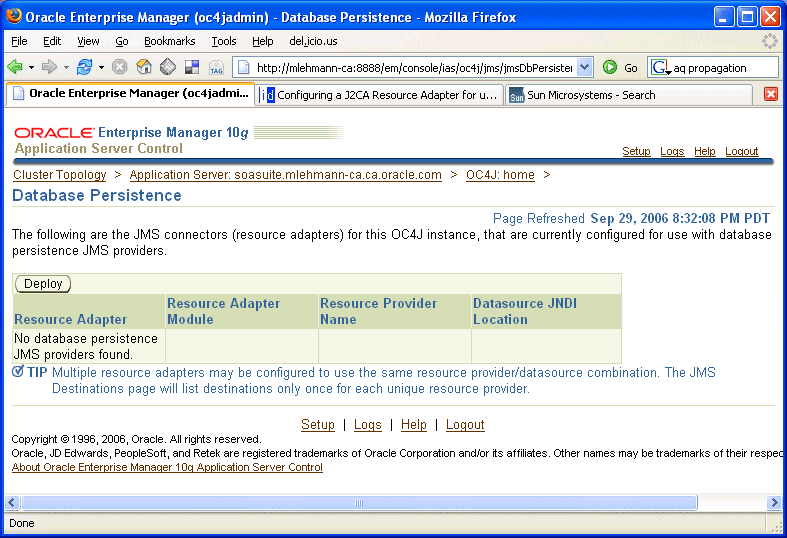
c. Name the resource adapter/provider and hook it up to the data source created previously. When you click on finish, you will be asked to restart the default application. Mine never came back so I ended up using opmnctl to do a full OC4J instance re-start ... I believe this is a bug in the developer preview that was fixed after its August release.


You can then see and do further configuration of the adapter on the adapters page. From a lot of doc to about a 4 click operation, I have to say the ASControls folks who I have the luck to know reasonably well, did a great simplification job of a complex area!


5. Now for my application clients using the OEMS Database provider, I need to surface my topic with some logical names. This I found this confusing though correctly documented but again ASControl made short work of exactly the things I needed to do:

a. Make sure an appropriate connection factory is available by going to the connection factory tab of my newly created resource adapter (picture below), name it (I gave it the adapter name - simpleOemsRA/MyTCF) and give it a private connection pool for simplicity.


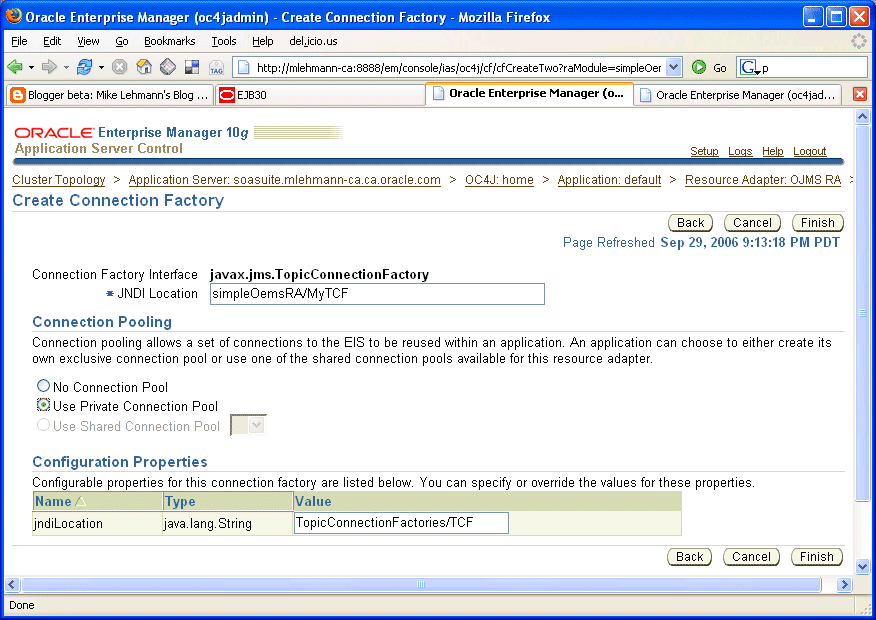
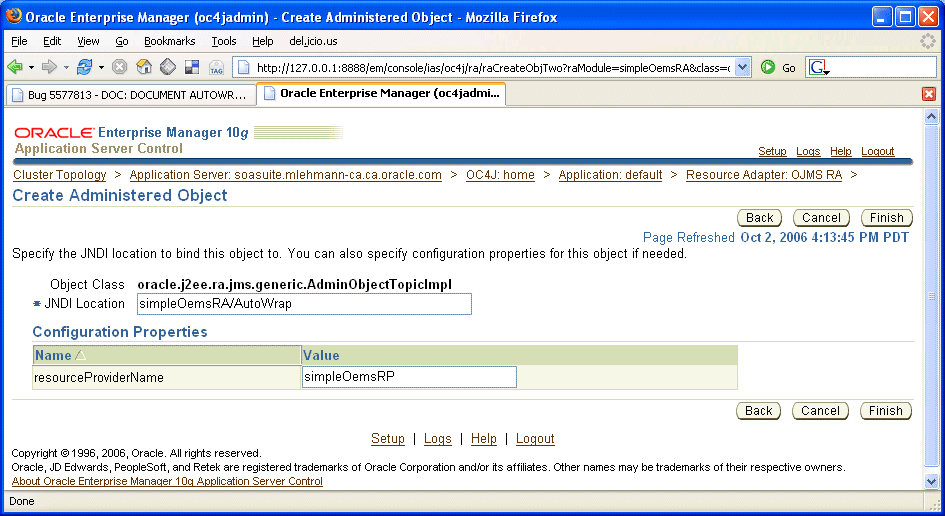
b. Name my administered topic object (oracle.j2ee.ra.jms.generic.AdminObjectTopicImpl from the drop down list box) to provide a JNDI mapping to the physical database topic JMSDEMO_TOPIC and finally hook it up to the resource provider created during deployment.

This has two parts so here are they are in detail:

b1. Unlike the OracleAS JMS screen you will see that you do *not* have to provide the JNDI location and JNDI name for the Topic. You just give a JNDI location. You can provide a JNDI name but you would have to manually edit the underlying oc4j-connectors.xml. What this is "encouraging" is the use of autowrapping of the destinations. So enter your JNDI name - I chose simpleOemsRA/AutoWrap because this JNDI name will be the "automatic" wrapper for all my topics. See later for some details on this.

b2. Second the screen asks for the resource provider name and defaults it to ojmsrp when you should be using the resource provider name you used when deploying the resource adapter - in our case simpleOemsRP - both b1 and b2 are shown in the screen sequence below.


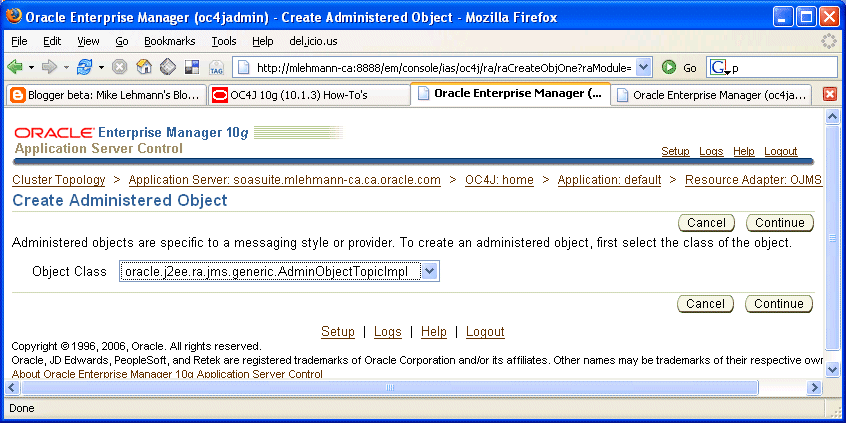
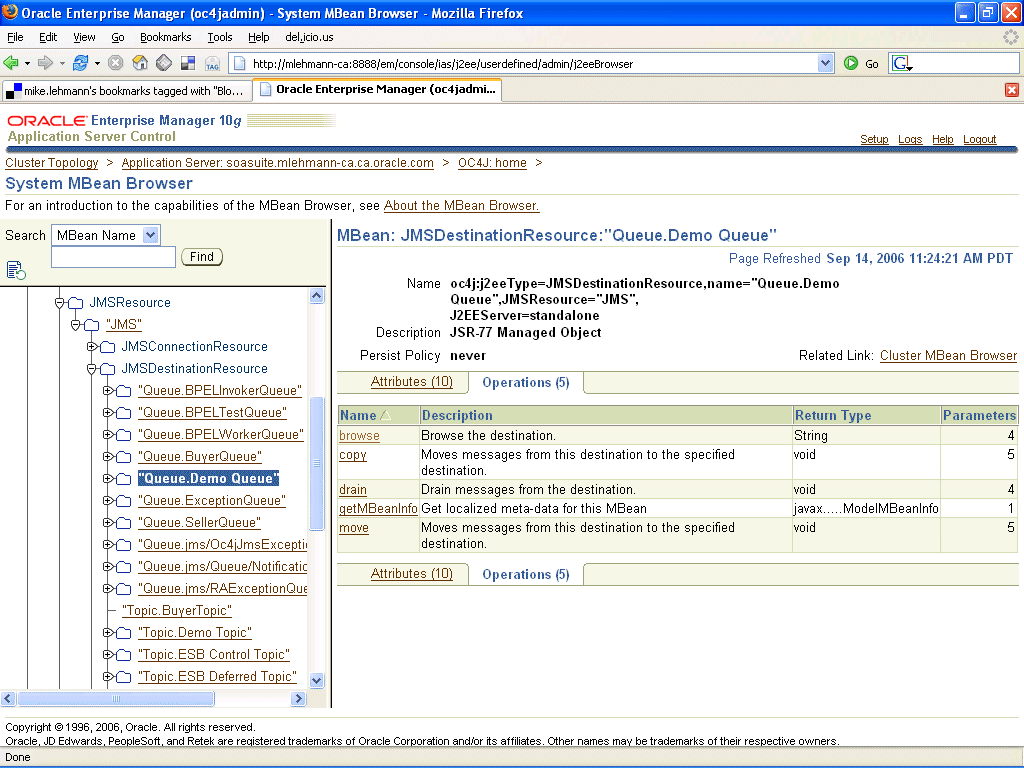
To get a sense of some comfort that things are working at this stage, if you go back to the Administer OEMS tab of the Application Server Control you should be able to see the physical AQ JMSDEMO_TOPIC in the list of available topics that are hooked up to the environment like below with a JNDI URL of something like java:comp/resource/simpleOemsRP/Topics/JMSDEMO_TOPIC:


What's up here? I can see that from my configuration of my resource provider having a database connection we created earlier it automatically discovered my topic. That's cool! But what is also interesting is the resolution of the physical JNDI name - java:comp/resource/simpleOemsRP/Topics/JMSDEMO_TOPIC - where did that /Topics/ come from?

It turns out that is part of how OEMS Database provider queues and topics are surfaced through the resource provider
- the prefix /Topics/ and /Queues/ are prefixed on the database queue/topic name. As such, taking an example, a database topic named JMSDEMO_TOPIC will have the physical suffix of Topics/JMSDEMO_TOPIC. Likewise with queues, a database queue named JMSDEMO_QUEUE will have a physical suffix of Queues/JMSDEMO_QUEUE. This is doc'd more formally just under the table this URL points at:

http://download-east.oracle.com/docs/cd/B25221_04/web.1013/b14427/jms.htm#sthref295

The end result when working with MDBs and clients, the JNDI location you will use for this example is going to have the logical name of (using my example): simpleOemsRA/Autowrap/Topics/JMSDEMO_TOPIC which in turn will resolve to the physical name java:comp/resource/simpleOemsRP/Topics/JMSDEMO_TOPIC. Check out my MDB at the end of this blog where I provide this setting in the destination name. If you want to manually wrap this in order to obfusticate the JMSDEMO_TOPIC name you can as well but this is not avialable from the ASControl screen.

5. With that, everything - at least the minimal - is done and it is possible to write an MDB. Again following the lazy man's approach I will use EJB 3.0 so I can do it all in as little configuration as possible. Mucking around my MDB pretty much wires up to the configuration done above and does a simple printout of the message off the queue. It looks like the following code at the end of this [1] blog - code liberally stolen from Debu Panda's EJB 3.0 MDB samples at http://otn.oracle.com/ejb3.

6. As I was doing this in JDeveloper, I simply packaged this guy up in an ear and then used the admin_client deployment tool to deploy it as follows:

SET JAVA_HOME=d:\jdk150
SET PATH=d:\jdk150\bin
SET ORACLE_HOME=d:\soasuite
java -jar %ORACLE_HOME%\j2ee\home\admin_client.jar deployer:oc4j:opmn://127.0.0.1:6003/home oc4jadmin welcome1 -deploy -file D:\mywork\oemsMDB\deploy\myMDB.ear -deploymentName myMDB


7. Then of course we need a client to throw messages on the queue. The easiest way is to write a simple Java client. Again in the spirit of begging and borrowing code, I have taken a sample from the JMS product manager, Demed LHer and slimmed it down to the bare essentials so it just does that one thing in [2].

To run that client you simply have to compile it with the right classpath:

set AS_HOME=D:\soasuite
set DB_HOME=D:\oraclexe\app\oracle\product\10.2.0\server
set JAVA_HOME=D:\jdk150 CLASSPATH=.;%DB_HOME%/RDBMS/jlib/aqapi13.jar;%DB_HOME%/RDBMS/jlib/jmscommon.jar;%DB_HOME%/RDBMS/jlib/xdb.jar;%DB_HOME%/lib/xmlparserv2.jar;%DB_HOME%/jdbc/lib/ojdbc14.jar;%DB_HOME%/jlib/orai18n.jar;%DB_HOME%/jlib/jndi.jar;%J2EE_HOME%/lib/jta.jar
javac -classpath %CLASSPATH% Send.java
java Send "JMSDEMO_TOPIC"

And there you go. If you look in your ORACLE_HOME\opmn\logs you should see the MDB sucking the above message off the topic and spitting out the results using its System.out.println.

I can't say it was trivial, but broken down to its simplest form, hopefully it is a building block that can be generalized for others!

[1] My MDB:

package demo.mdb;

import java.util.Date;

import javax.ejb.MessageDriven;
import oracle.j2ee.ejb.MessageDrivenDeployment;
import javax.ejb.ActivationConfigProperty;
import javax.jms.Message;
import javax.jms.MessageListener;

import javax.jms.Message;

@MessageDriven(
activationConfig = {
@ActivationConfigProperty(
propertyName="ConnectionFactoryJndiName", propertyValue="simpleOemsRA/MyTCF"),
@ActivationConfigProperty(
propertyName="DestinationName", propertyValue="simpleOemsRA/AutoWrap/Topics/JMSDEMO_TOPIC"),
@ActivationConfigProperty(
propertyName="DestinationType", propertyValue="javax.jms.Topic"),
@ActivationConfigProperty(
propertyName="SubscriptionDurability", propertyValue="Durable"),
@ActivationConfigProperty(
propertyName="SubscriptionName", propertyValue="MySubscription"),
@ActivationConfigProperty(
propertyName="messageSelector", propertyValue="RECIPIENT = 'MDB'")
})


// associate MDB with the database JMS resource adapter
@MessageDrivenDeployment(resourceAdapter = "simpleOemsRA")
/**
* This is a very simple example of a Message-Driven Bean configured to listen
* on an AQ Topic using the generic resource adapter for JMS. It listens to the
* configured Topic and gets notified via an invocation of it's
* onMessage() method when a message has been posted to the Topic. This
* bean simply prints out the contents of the message.
*/
public class MessageTopicProcessor {


public void onMessage(Message message) {
System.out.println("onMessage() - " + message);
try {

String subject = message.getStringProperty("subject");
String inmessage = message.getStringProperty("message");
System.out.println("Message received\n\tDate: "
+ new java.util.Date() + "\n\tSubject: " + subject
+ "\n\tMessage: " + inmessage + "\n");
}

catch (Throwable ex) {
ex.printStackTrace();
}
}

}


[2] Sample Database JMS Client

/*
*
* If using Oracle XE, the following jar files are required in your classpath to
* run this example:
*
* .;%DB_HOME%/RDBMS/jlib/aqapi13.jar;%DB_HOME%/RDBMS/jlib/jmscommon.jar;
* %DB_HOME%/RDBMS/jlib/xdb.jar;%DB_HOME%/lib/xmlparserv2.jar;
* %DB_HOME%/jdbc/lib/ojdbc14.jar;%DB_HOME%/jlib/orai18n.jar;%DB_HOME%/jlib/jndi.jar;%J2EE_HOME%/lib/jta.jar
*
*/

// Java infrastructure packages
import java.lang.*;
import java.util.Properties;
import java.io.FileInputStream;
import java.io.IOException;
import java.io.InputStream;

// JMS packages
import oracle.AQ.*;
import oracle.jms.*;
import javax.jms.*;

/* -------------------------------------------------------
* Send
* ------------------------------------------------------- */
public class Send
{

// Here's the XML payload to put in a text message
private final static String SOME_XML =
"\n" +
"\n" +
" \n" +
" John\n" +
" W\n" +
" Doe\n" +
"
\n"+
"
";

public static void main (String args [])
throws java.sql.SQLException, ClassNotFoundException, JMSException
{

TopicConnectionFactory tcfact =null;
TopicConnection tconn =null;
Topic topic =null;
TopicSession tsess =null;
TopicPublisher publisher = null;
TopicSubscriber subscriber = null;
TextMessage txtmsg, dtxtmsg;
String destName = "JMSDEMO_TOPIC";
String dbHost = "127.0.0.1";
String dbPort = "1521";
String dbSid = "XE";
String dbDriver = "thin";
String dbUser = "jmsuser";
String dbPassword = "jmsuser";

System.out.println("\n-------------------------------------------------------------");
System.out.println("OEMS.155 - simple JMS Send / JMS 1.02 / Database AQ / no JNDI");
System.out.println("-------------------------------------------------------------");


// get destination to Send on from command-line
try {
destName = args[0];
} catch (Exception e) {
System.out.println("** please provide a destination to send on [" + args.length + "]");
usage();
System.exit(0);
}


try {
// get connection factory - we are not going through JNDI here
tcfact = AQjmsFactory.getTopicConnectionFactory(dbHost, dbSid, Integer.parseInt(dbPort), dbDriver);
System.out.println("Connection factory = " + tcfact.toString());
// create connection
tconn = tcfact.createTopicConnection(dbUser,dbPassword);
System.out.println("Created connection = " + tconn.toString());
// create session
tsess = tconn.createTopicSession(true, Session.CLIENT_ACKNOWLEDGE);
System.out.println("Created session = " + tsess.toString());
// start connection
tconn.start() ;
System.out.println("started connection");
// get topic
topic = ((AQjmsSession)tsess).getTopic(dbUser,destName) ;
System.out.println("Got topic = " + topic.toString());
System.out.println("started session = " + tsess.toString());

} catch (JMSException e) {
System.err.println("** JMS: failed starting session. Do not forget to run the SQL scripts to create necessary tables in RDBMS.\n");
e.printStackTrace();
System.exit(-1);
}


try {
publisher = tsess.createPublisher(topic);
txtmsg = tsess.createTextMessage(SOME_XML) ;
System.out.println("\ndestination: " + topic + "\nmessage :\n\n" + SOME_XML);
publisher.publish(topic, txtmsg) ;
tsess.commit() ;
System.out.println("\nmessage was sent with ID="+txtmsg.getJMSMessageID());
} catch (Exception e) {
System.err.println("** Problem publishing messaging:\n");
e.printStackTrace();
}

// Cleaning up before exiting
try {
//((AQjmsDestination)topic).stop(tsess, true, true, false);
tsess.close() ;
tconn.close() ;
} catch (Exception e) {
System.err.println("** Problem terminating session and connection:\n");
e.printStackTrace();
}

}

/*-----------------------------------------------------------------------
* usage
* prints program usage
*----------------------------------------------------------------------*/

private static void usage() {
System.err.println("\nUsage: Send ");
System.err.println("Ex : Send JMSDEMO_TOPIC");
}
}

Friday, September 29, 2006

Propagating JMS Messages to Multiple Targets

I was investigating the Oracle JMS Router (Doc: http://download-west.oracle.com/docs/cd/B25221_04/web.1013/b14427/jms.htm#sthref378 ) for a customer today as a mechanism for propagating messages from queues and topics to other queues and topics and thought I would point out a couple of things.

I was trying to implement a picture that looks like the one below using the JMS Router - the JMS router maintains a backlog of jobs that run watching whatever source queues and topics you set up and propagates them to your target destination queues and topics:


What the customer was trying to do was propagate an inbound message to 3 different systems. The strategy they were looking at was to have a topic and then on each system have an MDB that listened to the topic and moved it into a queue for processing by each system. The issue with the approach was the number of MDB that had to be written and maintained over time. With one topic and three target queues this may be a reasonable approach but once you get to dozens of topics each with many targets, writing code gets pretty unreasonable.

The JMS Router lets you make this a configuration exercise. You simply add a job to the JMS router environment to listen to the inbound topic and tell it which queue you want it propagated to. In this case because there are 3 target queues, I simply need to add 3 jobs.

How hard is this to do? Well, in OracleAS 10.1.3 the JMS Router is pre-deployed and ready to go. It took me about 10 minutes to configure this up - I had a handy Java client for throwing messages at a topic so once configured, I could see it in action pretty quickly using Hermes as discussed in an earlier post. You can configure it in two ways:

1. Edit the jms.xml file and add its configuration
2. Use the MBean browser in OracleAS 10.1.3 to do this

For a step by step how-to check out this document on OTN:

http://www.oracle.com/technology/tech/java/oc4j/1013/how_to/how-to-use-JMS-router/doc/How-to-Use-JMS-Router.html

For my configuration I have included the bits from jms.xml here - while this looks verbose you will see the configuration is identical per job with one change being the job name and the target queue:

<jms-router max-local-concurrency="-1" >
<router-job
job-name="job1"
max-retries="16"
polling-interval="5"
pause-job="false"
use-exception-queue="false"
batch-size="30"
>
<message-source>OracleASjms/Topics/jms/demoTopic</message-source>
<source-connection-factory>OracleASjms/MyCF</source-connection-factory>
<message-selector></message-selector>
<subscriber-name>OracleASRouter_job1</subscriber-name>
<source-log-queue>OracleASjms/Queues/OracleASRouter_LOGQ</source-log-queue>
<message-target>OracleASjms/Queues/jms/demoQueue</message-target>
<target-connection-factory>OracleASjms/MyCF</target-connection-factory>
<target-log-queue>OracleASjms/Queues/OracleASRouter_LOGQ</target-log-queue>
<exception-queue>default</exception-queue>
</router-job>
<router-job
job-name="job2"
max-retries="16"
polling-interval="5"
pause-job="false"
use-exception-queue="false"
batch-size="30"
>
<message-source>OracleASjms/Topics/jms/demoTopic</message-source>
<source-connection-factory>OracleASjms/MyCF</source-connection-factory>
<message-selector></message-selector>
<subscriber-name>OracleASRouter_job2</subscriber-name>
<source-log-queue>OracleASjms/Queues/OracleASRouter_LOGQ</source-log-queue>
<message-target>OracleASjms/Queues/jms/demoQueue2</message-target>
<target-connection-factory>OracleASjms/MyCF</target-connection-factory>
<target-log-queue>OracleASjms/Queues/OracleASRouter_LOGQ</target-log-queue>
<exception-queue>default</exception-queue>
</router-job>

<jms-router max-local-concurrency="-1" >
<router-job
job-name="job3"
max-retries="16"
polling-interval="5"
pause-job="false"
use-exception-queue="false"
batch-size="30"
>
<message-source>OracleASjms/Topics/jms/demoTopic</message-source>
<source-connection-factory>OracleASjms/MyCF</source-connection-factory>
<message-selector></message-selector>
<subscriber-name>OracleASRouter_job3</subscriber-name>
<source-log-queue>OracleASjms/Queues/OracleASRouter_LOGQ</source-log-queue>
<message-target>OracleASjms/Queues/jms/demoQueue3</message-target>
<target-connection-factory>OracleASjms/MyCF</target-connection-factory>
<target-log-queue>OracleASjms/Queues/OracleASRouter_LOGQ</target-log-queue>
<exception-queue>default</exception-queue>
</router-job>

</jms-router>


and a screen shot of me adding one job via the MBean browser here - this defaults a number of parameters so the minimal needed here is just the source message, source connection factory, target destination and target connection factory. Because I am lazy, this is how I did it -- then once I had one job entered I copied and pasted in jms.xml and res-start the server. Using ASControl this way lets you do it without a re-start as it goes through the proper JMX entry points. This one begs for a groovy script - more on that later - to automate configuration.


If you need a simple way to route messages to multiple targets and don't want to be writing a lot of code to make it happen manually, this could be your answer. Nice to see this baked right into the product with a minimum of fuss or muss to make it work.

Sunday, September 24, 2006

Reliable Singleton OC4J Instances on OracleAS

I was working on a customer question this week which revolved around the ability to ensure a highly available singleton OC4J instance in OracleAS. After mucking about and looking around I remembered a feature that is designed to provide exactly this called Service Failover. It is documented here:

http://download-west.oracle.com/docs/cd/B25221_04/core.1013/b15976/common.htm#sthref631

but I think a picture illustrates better what I was trying to do and then the implementation of it is a lot easier to follow. Figure 1 below shows the idea:


Figure 1: Active Singleton OC4J Instance

Here you can see the orange OC4J instance named j2ee_1 in an OracleAS instance called soa_j2ee as the singleton, active node. It is part of a group of OC4J's called singleton_group where there is another stopped OC4J instance called j2ee_1 in an OracleAS called soasuite (for arguments sake on another hardware node assuming that the redundancy we are seeking is to deal with hardware failure).

When j2ee_1 in OracleAS instance soa_j2ee fails, the action I want is illustrated in figure 2


Figure 2: Singleton Instance Failed Over to New Singleton

When my singleton OC4J went down, the application server noticed it and immediately started up the backup OC4J in another part of the cluster, the OracleAS instance soasuite.

Ideally, depending on my requirement for redundancy I could carry this scenario on on many different nodes. The question is how? Turns out it is a very simple feature to implement.

The trick is with the process service (OPMN) that is watching over an OracleAS cluster. The lines that start an OC4J instance in the process server XML configuration file (opmn.xml) typically look like this with much of the extra bit deleted for simplicity here:

<ias-component id="singleton_group" status="enabled">
<process-type id="j2ee_1" status="enabled" >
<module-data>
<category id="start-parameters">
<data id="java-options" value="-server -Djava.security.policy=$ORACLE_HOME/j2ee/j2ee1/config/java2.policy -Djava.awt.headless=true -Dhttp.webdir.enable=false"/>
...
<process-set id="singleton_group" numprocs="1">
</process-type>
</ias-component>


The crux of it is OPMN is providing parameters for the JVM(s) that start the application server, port ranges (because there will be many OC4J's running in a cluster) and miscellaneous other settings.

To turn on a failover policy that says I want 1 and only one of these OC4J instances running in a cluster I simply need to add two parameters:

  • service-failover="1" - to indicate I want only one of these OC4J's in my cluster
  • service-weight="100" - an arbitrary logical weighting that will give OPMN a preference which of the configured failover instances I want the server to start in the event of a failure of another. A larger number means OPMN will prefer starting the failover instance than one configured with a smaller number
For a single OC4J instance configured with this service failover, the configuration looks like this:

<ias-component id="singleton_group" status="enabled">
<process-type id="j2ee_1" status="enabled"
service-failover="1" service-weight="200">
<module-data>
<category id="start-parameters">
<data id="java-options" value="-server -Djava.security.policy=$ORACLE_HOME/j2ee/j2ee1/config/java2.policy -Djava.awt.headless=true -Dhttp.webdir.enable=false"/>
...
<process-set id="singleton_group">
</process-type>
</ias-component>

Also note that on the process-set id I removed the numprocs="1" as service-failover does not support numprocs (i.e. multi-JVM).

The trick on this one is that the OC4J instance name has to be the same (in my case j2ee_1) and the group in which the OC4J instance resides also has to be identical (in my case you can see my group is called singleton_group).

If you were to look at my other OracleAS instance you would see an identically configured OC4J instance with the same group and same OC4J instance name. Setting up the topology of groups and OC4J instances is trivial in Application Server Control where these a simple operations as shown below:


What does it look like operationally? Well, now you know why I was playing with iHat earlier on in the week ...


What I did to test it was the following:

  1. Started up the application server with the configuration outlined above. I could see the picture above where the single j2ee_1 was happily running on the soa_j2ee OracleAS instance and stopped correctly on the soasuite OracleAS instance
  2. Then I went out to the file system $ORACLE_SOA_J2EE_HOME\j2ee\j2ee_1\config and renamed server.xml to dead_server.xml.
  3. Then I ran the application server command:

    opmnctl restartproc ias_component=singleton_group

    to bounce the server on soa_j2ee
  4. Of course when it brought down my j2ee_1 instance on soa_j2ee and then tried to re-start it failed as server.xml is the basic configuration for the Oc4J instance
  5. Almost immediately after that failure, I saw within iHat the backup instance start up.
In real life you could configure as many of these backup instances as you want in order to have the right amount of redundancy for your situation ... there is no limit. I also was using this to solve a singleton problem. You can use it to create doubleton's or tripletons by simply making the service-failover number equal to the number of unique instances you want running in your topology.

Thursday, September 21, 2006

Visualizing Middleware Topologies

The other day I was writing about how OracleAS supports multiple JVMs (
http://mike-lehmann.blogspot.com/2006/09/scaling-oracleas-with-multiple-jvms.html
) and you will have seen in the pictures (http://photos1.blogger.com/blogger2/3046/4153/1600/jvm.gif and http://photos1.blogger.com/blogger2/3046/4153/1600/ascjvm.gif ) ASControl provides simple configurability and simple viewing of the number of JVMs per OC4J.

One thing that would be nice to see in the above situation *and* is not in the OracleAS Control 10.1.3 is a local topology viewer (it was available in 10.1.2.0.2). In OracleAS 10.1.3, you can get this two ways: 1. Go to Grid Control R2 (http://www.oracle.com/technology/products/oem/index.html) which can manage OracleAS 10.1.3 instances; 2. Look at a very lightweight utility called iHat.

While GridControl is a incredibly powerful management tool, it does bring along a bit of overhead to my laptop as it really is an enterprise management tool designed to manage Databases, OracleAS, Ebusiness Suite, Collaboration Suite and as of recently, a large swath of third party software and hardware providers (BEA WebLogic, WebSphere, .NET, a number of load balancers and firewalls amongst others).

For me wanting to get a quick and dirty topology view - particularly with the multiple JVM feature discussed above - iHat is my favourite lightweight alternative. It is a very lightweight useful tool using Macromedia Flash to visualize the Oracle Application Server topologies. It reads the OracleAS process management environment to construct a view of your basic topology (HTTP server, OC4J’s) but also HTTP request routing relationships and actual runtime processes in the environment. It is downloadable from here - http://www.oracle.com/technology/products/ias/utilities/index.html - a simple zip file that you unzip anywhere, hook it up to a JDK and point it at your OracleAS environment and away you go.

The picture below shows how my OracleAS instance which contains two OC4J instances each with 2 JVMs – the same configuration shown in my previous post. As you can also see you get a quick picture of my overall set of OracleAS instances (soa_j2ee, soasuite and soa_web) each of which I can click on to see a pretty useful visual of what is going on in that instance.


Somewhat even more interesting, you can use this tool to kill processes and see the HA environment in action – whether it be killing the entire instance, a process or a particular JVM. I use this frequently when showing OracleAS HA and how resilient OracleAS is even running stateful applications where it simply routes around any availability issue and also automatically tries to recover any down instances that may have failed for some reason.

The pointing at the OracleAS environment is pretty straightforward. Aside from needing an installation of the application server (managed version), the main trick is finding out the OPMN request port from which iHat is able to discover the OracleAS. Fortunately in OracleAS 10.1.3.1 the port page for the application server returns like it was there in OracleAS 10.1.2 as shown below:


The port you are looking for is the request port, highlighted here. If you are running a multiple instance environment you will see several request ports - any one will do. Once you have it the steps to start up iHat are shown below - as you have can tell my JDK is located at d:\jdk150, I am running it on my local machine and I chose the instance running in my ORACLE_HOME soasuite:

set JAVA_HOME=d:\jdk150
set PATH=d:\jdk150\bin
set ORACLE_HOME=d:\soasuite
java -classpath %ORACLE_HOME%/opmn/lib/optic.jar;d:\iHAT\ihat.jar oracle.ias.opmn.ihat.WebServer 7778 127.0.0.1:6006

The 6006 port is my request port and 7778 is the port I chose to run iHat on. Once I have done that I simply point my browser at http://localhost:7778 and the iHat tool will appear. This does rely on Flash to be working in your browser which generally is not a problem.

Check it out - a handy tool for visualizing your application server environment :-)

Sunday, September 17, 2006

Virtual Private Database - Discoverer and Java

I was out visiting a customer last week and talking about various bits of our technology. They are heavily dependent in all their new applications on Oracle Virtual Private Database as a way of keeping data confidentiality across a shared user population reporting and transacting against that data. As a result of this they depend on the user identity being propagated through to the database from the middle tier reporting and application layer to enable VPD to do its magic.

As the product set they were investigating included OracleAS Portal, BI Discoverer and Oracle Application Server (OC4J) , they had several questions around how their secure, as I came to think of it, "business intelligence portal" would work:

1. For reporting they have been prototyping quite successfully with BI Discoverer but now needed to understand if and how BI Discoverer + portal single signon work with VPD

2. For their custom Java applications, again how do they interact with successfully with VPD

For the first, it turns out to be quite simple and is well documented. There is direct integration between the OracleAS Portal single sign on solution and virtual private database. Here is the documentation:

http://download-west.oracle.com/docs/cd/B14099_19/bi.1012/b13918/security2.htm#sthref1008

For the second, it is slight more technical as the solution naturally is Java centric but fortunately the product management team for OC4J has put together a small sample that pretty much gives the answer in a few lines of code:

Article:
http://www.oracle.com/technology/tech/java/oc4j/1013/how_to/how-to-ds-proxy/doc/how-to-ds-proxy.html,

Source:
http://www.oracle.com/technology/tech/java/oc4j/1013/how_to/how-to-ds-proxy/how-to-ds-proxy.zip

In the second example, once the user identity is set on the proxy authentication, all the normal VPD machinery kicks into place and executes as expected.

This combination of 4 products - OracleAS Portal, Discoverer, Oracle SSO and OC4J - is quite interesting to see work together and can be quite compelling depending on the use case. Rather than stitching 4 heterogeneous products across 4 different vendors to get a secure business intelligence portal (business issue 1), not only has the product integration being done from the start, the key value this particular customer was after, VPD integration, has also been pre-done literally out of the box (business issue 2 - why I was there).

Thursday, September 14, 2006

OracleAS JMS, Hermes and MBeans

I was working with OracleAS JMS over the last few days (actually with the Oracle ESB which uses OracleAS JMS under the covers) and wanted to see the message queue contents as well as replay some messages. Looking around I noticed this recent addition to the Hermes JMS client - instructions for setting up Hermes to work with OracleAS and an accompanying viewlet.

The only problem was that I was not using stand-alone OC4J (the 70M download) but the managed version of OracleAS so the configuration was slightly different. First thing that changes is you have to add the optic.jar library to the list of libraries so that Hermes can understand the managed OracleAS process management environment (OPMN). The addition to the libraries is shown below:


and then when pointing Hermes at my instance, instead of using the ORMI port of stand-alone OC4J (ormi://localhost:23791) as shown on the Hermes site, I had to point at the process management port (typically 6003) so that the cluster of OC4J instances I have running on my laptop could be discovered as shown below (default is the parent application in any particular container):


Once that was done, Hermes operated just like against a stand-alone environment and let me poke around in my queues and topics, replay messages etc:


Pretty cool.

Not total satisfied with that, I also wanted to muck around in the OracleAS Control management console and noticed a quick and dirty way to look at queue/topic content in the MBean browser - kind of going behind the scenes of the management console which is built on top of these MBeans.

Below is a picture sequence of browsing through the MBean browser to a particular queue, entering the bare minimum parameters to query the queue and the resulting output:


Obviously this is the technical backdoor as the majority of the ASControl management console is more focussed around task based interactions of configuring the server (e.g. like JMS queues and topics). However, if you happen to need this level of detail or are into very specific administrative scripting using a language like Groovy that is JMX aware, knowing that OracleAS is fully managable via these MBeans gives you infinite configurability over your application server environment.

For those not so inclined and more focussed on task based configuration - the goal of ASControl - JMS configurability is available from the console like the example shown below for creating a queues. Just choose your poison.


Like with the pluggability of Hermes into OracleAS, a topic for another day, to extend the MBean discussion, will be plugging the JDK JConsole and open source kits like MC4J into this environment.

Sunday, September 10, 2006

Stopping and Starting SOA Suite Components

Recently Oracle put out a preview of the SOA Suite (Overview: http://otn.oracle.com/soa, Download: http://www.oracle.com/technology/software/products/ias/soapreview.html).

The reason this packaging was created is, while all of the components in the SOA Suite in general are available as stand-alone products for those starting tactical projects, what seemed to happen in real life was most implementation projects almost inevitably required each of the components during some point in their lifecycle. Pre-integrating them and packaging them together eliminates the need to integrate your enabling technologies and lets you focus on creating business value while at the same time letting you only use exactly what you need.

To give a sense of this here are some simple use cases. A customer might start with a project to automate a simple business process with BPEL (Oracle BPEL Process Manager) to prove SOA is real and then realize they want to separate out the business rules into a rules engine (Oracle Business Rules) because their business policies frequently change. Or, after successfully automating a process, they want to secure key services in a managable fashion with WS-Security (Oracle Web Services Manager). Or, rather than using BPEL to do both the connectivity and process logic, they want a more formal intermediation layer connecting and routing to their backend systems (Oracle ESB).

To facilitate all approaches - use only one component (buy stand-alone components), grow organically as your project matures (add to your stand-alone buy) or start with all the pieces together, Oracle SOA Suite was created. The pieces in the SOA Suite are the Oracle BPEL Process Manager, Oracle Web Services Manager, Oracle Business Rules, Oracle Enterprise Service Bus and Oracle BAM. This can be run on Oracle Application Server or other application servers and comes along with the JDeveloper IDE. Optional to this is the Oracle Service Registry. This offering is complemented by those serious about business process management by the Oracle Business Process Analysis Suite.

A long opening story to get to the subject of this post which is some managability Oracle has added around the components of SOA Suite when installed altogether. The end result is once you install the SOA Suite - a one click install for developers as this picture shows (more complex deployment topologies available in the advanced install option):


you will find all 5 major components of the SOA Suite (Rules, BPEL PM, WSM and ESB) installed.

As you might imagine given it is Oracle, each of these products are simply a set of J2EE applications running the the application server you have decided to deploy them on. Because in the one click install developer mode the SOA Suite is deployed on a single instance of the application server, that can end up being a reasonably large number of J2EE applications (each component is typically 2 or more J2EE applications) with not much to distinguish them should you decide to start or stop one or more of the components.

To help make this about as trivial as possible, what the Application Server Control console team did was categorize the sub-applications of each SOA component so that when the user goes to do an application server administrative operation on, for example, the BPEL PM, they see a category called BPEL PM. And when they go to do an administrative operation on the rules engine, they see a category called Rules. And likewise for Web Services Manager and ESB. The picture below gives a sense of this:


As you can see it is pretty trivial to select one of the components and start, stop and even undeploy it should you not need it in a particular development or deployment environment. If you drill down a little further, you will see the underlying applications of each SOA component. If you are an administrator of those components these will be meaningful (e.g. in Web services manager the subcomponents are the core runtime, the management console, the policy manager and the gateway); if not, you likely don't care.


Clearly, this level of detail is typically important to your application server administrator or a technical developer rather than the analyst building rules, processes, policies or bus infrastructure. As you might imagine, each of these components have a more context aware console that you can get to from the SOA Suite lauch console (below):


so you can edit business rules, service policies, business processes and service bus characteristics.

This system view from the application server perspective is a taste of some of the integration work that was done to make working with these components as a unit, particularly during a development cycle, very clean and easy in the 10.1.3.1 release.

Friday, September 08, 2006

Scaling OracleAS with Multiple JVMs

An hugely useful capability of Oracle Application Server that has been in the product for a dogs age is what is called multiple processes per OC4J instance. In OracleAS 10.1.2 you can find it hidden away in the documentation here http://download-west.oracle.com/docs/cd/B14099_11/core.1012/b14001/optj2ee.htm#CACCHACG
and here http://download-west.oracle.com/docs/cd/B14099_11/core.1012/b14003/midtiermanage.htm#CACCHFJC

In summary what it lets you do is take one configuration set of an OC4J (J2EE Server) and instantiate n - you choose the number - instances of JVMs running that configuration set. Rather than you as the administrator installing n instances of the application server or manually starting n JVMs, the application server does it for you automatically by taking the parameter you enter for number of JVMs and running the OC4J with that many JVMs.

The end result is on machines that have large numbers of CPUs, or have huge CPU capacity from multi-core technologies or appliances like what Azul provides, it is really trivial to have your application, if it is CPU intensive, suck up all those resources for a minimum of adminstrative overhead. Clearly it gives you some availability too but limited to a single machine - it seldom is used for this (or is as a by product), rather it is to optimize your hardware It is a single parameter - turn up the number of JVMs or turn them down. No install, no extra deployment. Nothing.

Personally this has always seemed like an undermarketed feature of Oracle Application Server as not only does it give "free" scalablity and works for any J2EE application, it is so easy to use relative to what I have seen elsewhere. It is hugely popular in the Oracle install base because one you see it in action it is a no-brainer to use. Here's how it works.

The following picture give a sense of what the number of processes feature does.


What you see in the outer dark grey box is an Oracle Application Server instance - this is just a process space in which OC4J runs in. For those in the know this could be thought of as an instance managed by the process manager, Oracle Process Manager (OPMN). Within that, the lighter grey box, you can see that there is a OC4J instance called OC4J_home. What that really is is the configuration set or a set of configuration files associated with this J2EE/Oc4J server - the start up parameters of the server, the J2EE applications deployed to it, the queues, topics, datasources and adapters configured. An Oc4J configuration instance, so to speak, though that is not official terminology.

The white box, in the center, is the actual runtime instances of OC4J_home configuration instance. Within it you can see that there are 4 processes. What that shows is 4 JVMs running the OC4J_home instance and using the identical configuration set underpinning OC4J_home. If I change a datasource in that OC4J_home instance configuration, all 4 OC4J_home runtime instances know about it. If I deploy a new application, all 4 OC4J_home runtime instances know about it. It do my configuration operations once and all instances pick them up.

How do I turn this on? Well in OracleAS 10.1.3.1 I simple go to the server configuration page for a particular OC4J instance and tell the server how many JVMs to run like the picture below:

A single number and hit the apply button. That's it.

If I like editing XML I can go to <oracle_home>\opmn\conf\opmn.xml and edit the field called num_procs by the OC4J instance I am interested in but doing it from the console or scripting the change from JMX gracefully handles the startup of the changed configuration.

Once you have made your change, in OracleAS 10.1.3.1, you can go to any page and it will tell you how many JVM instances are running per OC4J instance as this picture shows (from the cluster topology page:


Pretty cool. Now in real life you frequently not only want to correctly utilize the CPU resources on your individual machines in the most efficient and operationally simply way possible (this being an example), clearly you also are concerned about availability should disaster strike and you need to fail over gracefully to other machines.

As the above picture shows most people actually run multiple OC4J instances with multiple JVMs and then distribute them across machines. The slightly expanded picture of the above screen below shows how not only can you use multiple JVMs on a single machine but you can pretty quickly and easily create groups of OC4J each with the tailored amount of JVMs spanning machine boundaries and application server instances.


Because I am but a poor man with only one machine I have to simulate 3 application server instances, one for two J2EE servers (soa_j2ee), one for an Apache HTTP server (soa_web) and another for what Oracle calls the SOA Suite (soasuite) containing our BPEL Process Manager, ESB, Rules engine, Web services manager amongst others. It is a contrived example but shows a simplified environment (imagining each of these instances on separate machines) that could deliver HA while utilizing machine resources effectively with the JVM feature.

At the bottom, which I suppose is a topic for another writeup, is the grouping feature which lets you group OC4J instances into a logical group that can span machines and OracleAS instances. Ironically, despite the seeming complexity of this setup, I would estimate it took me about 40 minutes to set it up - 2o minutes of which was running the one button click install while the bits were laid down on my machine.

From what has always been available as a simple 70 megabyte download - OC4J Stand-alone - (http://www.oracle.com/technology/tech/java/oc4j/10131/index.html) designed for developers (though many use it in production deployments because it is so lightweight and easy to use - corresponding to a single JVM in this writeup) to the full fledged managed version I am running here - Oracle Application Server - (http://www.oracle.com/technology/software/products/ias/soapreview.html) , this is not a bad story that I don't think is told very often or understood but at least a stab at it has been taken here :-)

Thursday, September 07, 2006

OracleAS 10.1.3 - Application Server Control

With Oracle Application Server 10.1.3, the architecture behind the management console of the server, Application Server Control (I use ASControl for short here), has changed. Rather than being installed with every instance of the Application Server that you install, it is a J2EE application and only enabled on a single instance within your application server cluster yet can manage all OC4J's within that cluster.

Normally after running the install of 10.1.3, you can go to http://<myhost>:<myport>/em and get access to it. If everything is set up right you will get an image like the one below:


This is in the ideal world. However you can find yourself messed up a little here. In the one click install things generally work out of the box as ASControl is enabled by default. For the advanced install - where people often are setting up more complex topologies (multi-OC4J, special repository configurations etc), you will see that you must specifically select an instance to be the management instance as this screenshot shows from the OracleAS 10.1.3.1 installer:

Where the trouble comes in for many people is that they go down the advanced install route and forget to check this box and then wonder why they can't get to the management console ASControl from their browser.

It turns out to be pretty straightforward to fix but until you have run into it it can be hard to dig through the documentation (http://download-east.oracle.com/docs/cd/B25221_04/index.htm - see the Administrative Guide) to track down the exact steps. So to help - and remember this is dated to OracleAS 10.1.3.0 or later - here are some suggested steps.

1. First check to see what the status of the ascontrol application is to run the command:

<oracle_home>\opmn\bin\opmnctl @cluster status -app

This will produce a table showing what applications are deployed to your Oracle Application Server cluster and which ones are active. In mine I have cut out the line to show only the status of the ascontrol application.

|pid | name | state | classification | rtid | routable |
|PID | ascontrol | stopped | external | g_rt_id | false |


2. If it is down, you probably want to start it up on a specific instance to get access to it. Remember you only have to do this on one OC4J instance. A quick way of doing this is running the following command:

<oracle_home>\opmn\bin\opmnctl startproc process-type=home application=ascontrol

Note a couple of things here. First, I removed the @cluster attribute because I want to focus on a single instance within my cluster and second I used the process-type attribute to specifically name an OC4J instance. In this case I chose "home" as the OC4J instance I wanted to start ASControl on. When you run the status command you will be provided with a listing of all the OC4J instances in your cluster (a less verbose way to see the OC4J instances is to use opmnctl @cluster status and remove the -app option - this will eliminate the status of the applications)

The reason this command will work is that ASControl is always deployed to every OC4J instance but is designed to only be started on one.

3. If all has gone well executing the command opmnctl @cluster status -app will have at least one line that looks like the following:

| pid | name | state | classification | rtid | routable |
| PID | ascontrol | started | external | g_rt_id | false |


A quick a dirty way to make this happen independent of the command is to actually edit the xml files that the opmnctl command operates on ... the file is <oracle_home>\\j2ee\\config\\server.xml - now after that command you will see an entry for ascontrol something like this:

<application name="ascontrol" path="../../home/applications/ascontrol.ear" parent="system" start="true">

If you had manually editted this by hand, you would have had to bounce the server (opmnctl stopall followed by opmnctl startall are the quickest routes) to have it take effect whereas the command line approach dealing with the application only removes this issue.

4. Following 3, you may be lucky now and be able to go from your browser to http://<myhost>:<myport>/em.

However, you may find that your ASControl application was already started (you did not have to follow steps 1-3) and you still can't connect. Or after following steps 1-3 you still can not connect. You may have the problem that I am showing in step 2 but did note.

The last reason for not being able to connect to ASControl through a browser is generally due to something called the routing id. Routing ids are a new feature in OracleAS 10.1.3 that let you route HTTP requests to specific instances or groups of OC4J - see: http://download-east.oracle.com/docs/cd/B25221_04/web.1013/b14432/topology.htm#CHDBAAFI

If it is turned off for your application, even though your application is started, no requests will be routed there. It is great feature to have fine grained control on how HTTP requests are routed across clusters of OC4J but painful when you just want to connect to one application!

It is pretty straightforward to fix this by going to the file:

<oracle_home>\j2ee\<oc4j_instance_name>\config\default-website.xml

and editting the line:

<web-app application="ascontrol" name="ascontrol" root="/em" startup="true" routing="false">

to be:

<web-app application="ascontrol" name="ascontrol" root="/em" startup="true">

If you are an advanced OC4J user you may have a different Web site file name - I am just using the default default-website.xml.

5. To make sure this takes effect, it would be good to bounce the ASControl application again on the OC4J instance you have chosen to run ASControl (in my case home) by running the commands:

<oracle_home>\opmn\bin\opmnctl stopproc process-type=home application=ascontrol

<oracle_home>\opmn\bin\opmnctl startproc process-type=home application=ascontrol

6. By now going to the URL http://<myhost>:<myport>/em should give you some success. I hope!